Wednesday, January 27, 2010

Layered Braids

This was my first time braiding Babydolls whole head, and it took me longer then I expected. I actually didn't even have a particular braid design in mind when i started, i just freestyled. (yes, i do that a lot. And yes, thats how my blogs name came to be)
I started by parting her hair into 3 sections (1 across the front of her head, 1 in the middle, and 1 in the back) I braided the back first, just doing straight cornrows going down and then continuing to braid down to the end of the hair. Then moved up to the middle section and did the same thing. For the front section I did 2 braids going back on the right side of her head, but for the left I did a few braids going to the side (See picture).
So this style ended up taking me about 1 1/2 - 2 hrs. Probably wont be doing this again real soon.
Photobucket
Dont mind her face in that pic, it was naptime.
The are a couple of things you can do to change the style up a little bit. We put barrettes in for school the next day.
Photobucket
And curled ends are really cute too.
Photobucket

Tuesday, January 26, 2010

Kai-Lan

If your daughter loves Kai-Lan as much as mine does, then this is the perfect style!
I started out by parting her hair ear to ear, and tying the back up so it is out of my way. Then i parted the front section diagonally, and cornrowed each of those sections. We added some barrettes to the ends.. you can add beads or whatever you like.
For the back, i parted it straight down the middle and did 2 cute little buns.. added a few bows and that was it. Very easy, and definately my daughters favorite style :)

Photobucket

Monday, January 25, 2010

We ♥ Curlformers!!

Just wanted to give you guys a quick review about what we thought of curlformers.
We absolutely love them!!
My daughter has natural loose curls, and i have been searching for something to tighten them up. I have tried everything from magnetic curlers, soft curlers, to hot irons.. my daughters curls ALWAYS fell flat.
Well after reading tons of great reviews, we decided to give curlformers a try. I picked up a couple of packs of the Long & Narrow Curlformers, and after giving my daughter a bath, we put them in. She seemed to sleep in them very comfortably, unlike with the magnetic rollers.. and they stayed in through the night.
We took them out the next morning and she had the most gorgeous curls! i thought great!.. but how long will they last? well after school that day her curls were still just as gorgeous, and hadn't fallen flat at all. They ended up lasting 2 days.. they might have lasted longer, but we washed her hair.
These were a little more expensive then other curling products we tried, but definately worth the money! I would recommend these to everybody. You can pick them up at any Sally Beauty for about 12$ a pack (each pack comes with 8 curlformers) i use 2 packs to do my daughters hair.. she really needs 3, so i will have to pick up another pack soon. We use the Long & Narrow Curlformers, but they have a few choices depending on how big of a curl your looking to do. And dont forget the "Hook" tool (you will NEED this).. about another 4$


Photobucket

Sunday, January 24, 2010

Side Cornrows With Curls


Ok, So I actually started out thinking i was going to do a braided mohawk but ended up running out of time. I loved how this came out though.

For this style you want to start off by sectioning out the hair that will be braided and tying back the rest of the hair so it is out of your way. Then just cornrow up the side.. Simple enough right? Unless your parts are off.. which always seems to happen to me. Believe it or not.. parting her hair straight is the hardest part of doing hair for me!
Then we put Curlformers in the rest of her hair to tighten her curls and keep her hair detangled through the night.
Photobucket

3 Strand Twist Out

This style was one of the first styles i ever did on Babydoll. Super easy and doesnt take much time at all if you're familiar with doing 3 strand twists. If not, im sure there are tons of "How To" videos on youtube. And Iwill try and do a video soon.
I started out by parting her hair ear to ear, and sectioned off the back into 1 pony tail. Then I parted the front section down the middle and made each of those into a pony tail on the sides of her head, From there i did (2) 3 strand twists on each of the front pony's, since there was more hair in the back pony i did about 3 or 4 twists.
She actually wore her hair like that for a day, it is another cute style.. unfortunately i didnt take pics of that 1. I will have to redo it for a later blog.
Anyways, the next day we took out the twists and this was the result. Our first attempt at a twist out.
Photobucket

Saturday, January 23, 2010

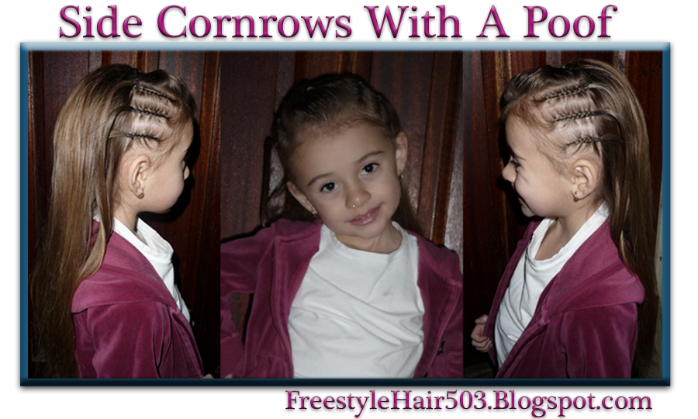
Side Cornrows With A Poof

Welcome to Freestyle Hair!
The page is still under construction so please bear with us while we finish building the site :)


Our First style is a fairly quick and easy 'Do.
Side Cornrows With A Poof.

This style took about 30 minutes to do, less if you decide not to flat iron.. it would be beautiful with curls as well.

I started by parting off her hair on the sides and doing 3 cornrows on each side. Then i used a flat iron to straighten her hair. Next i took a section of hair on top of her head, layed it flat on her head, then pushed it forward to create the "poof" and secured it with 2 bobby pins in an "X" shape.
And there you have it!

Photobucket